I feel handicapped in Windows terminals, here is why, and how I fixed it.
As a seasoned developer, I live in the terminal on Linux machines.
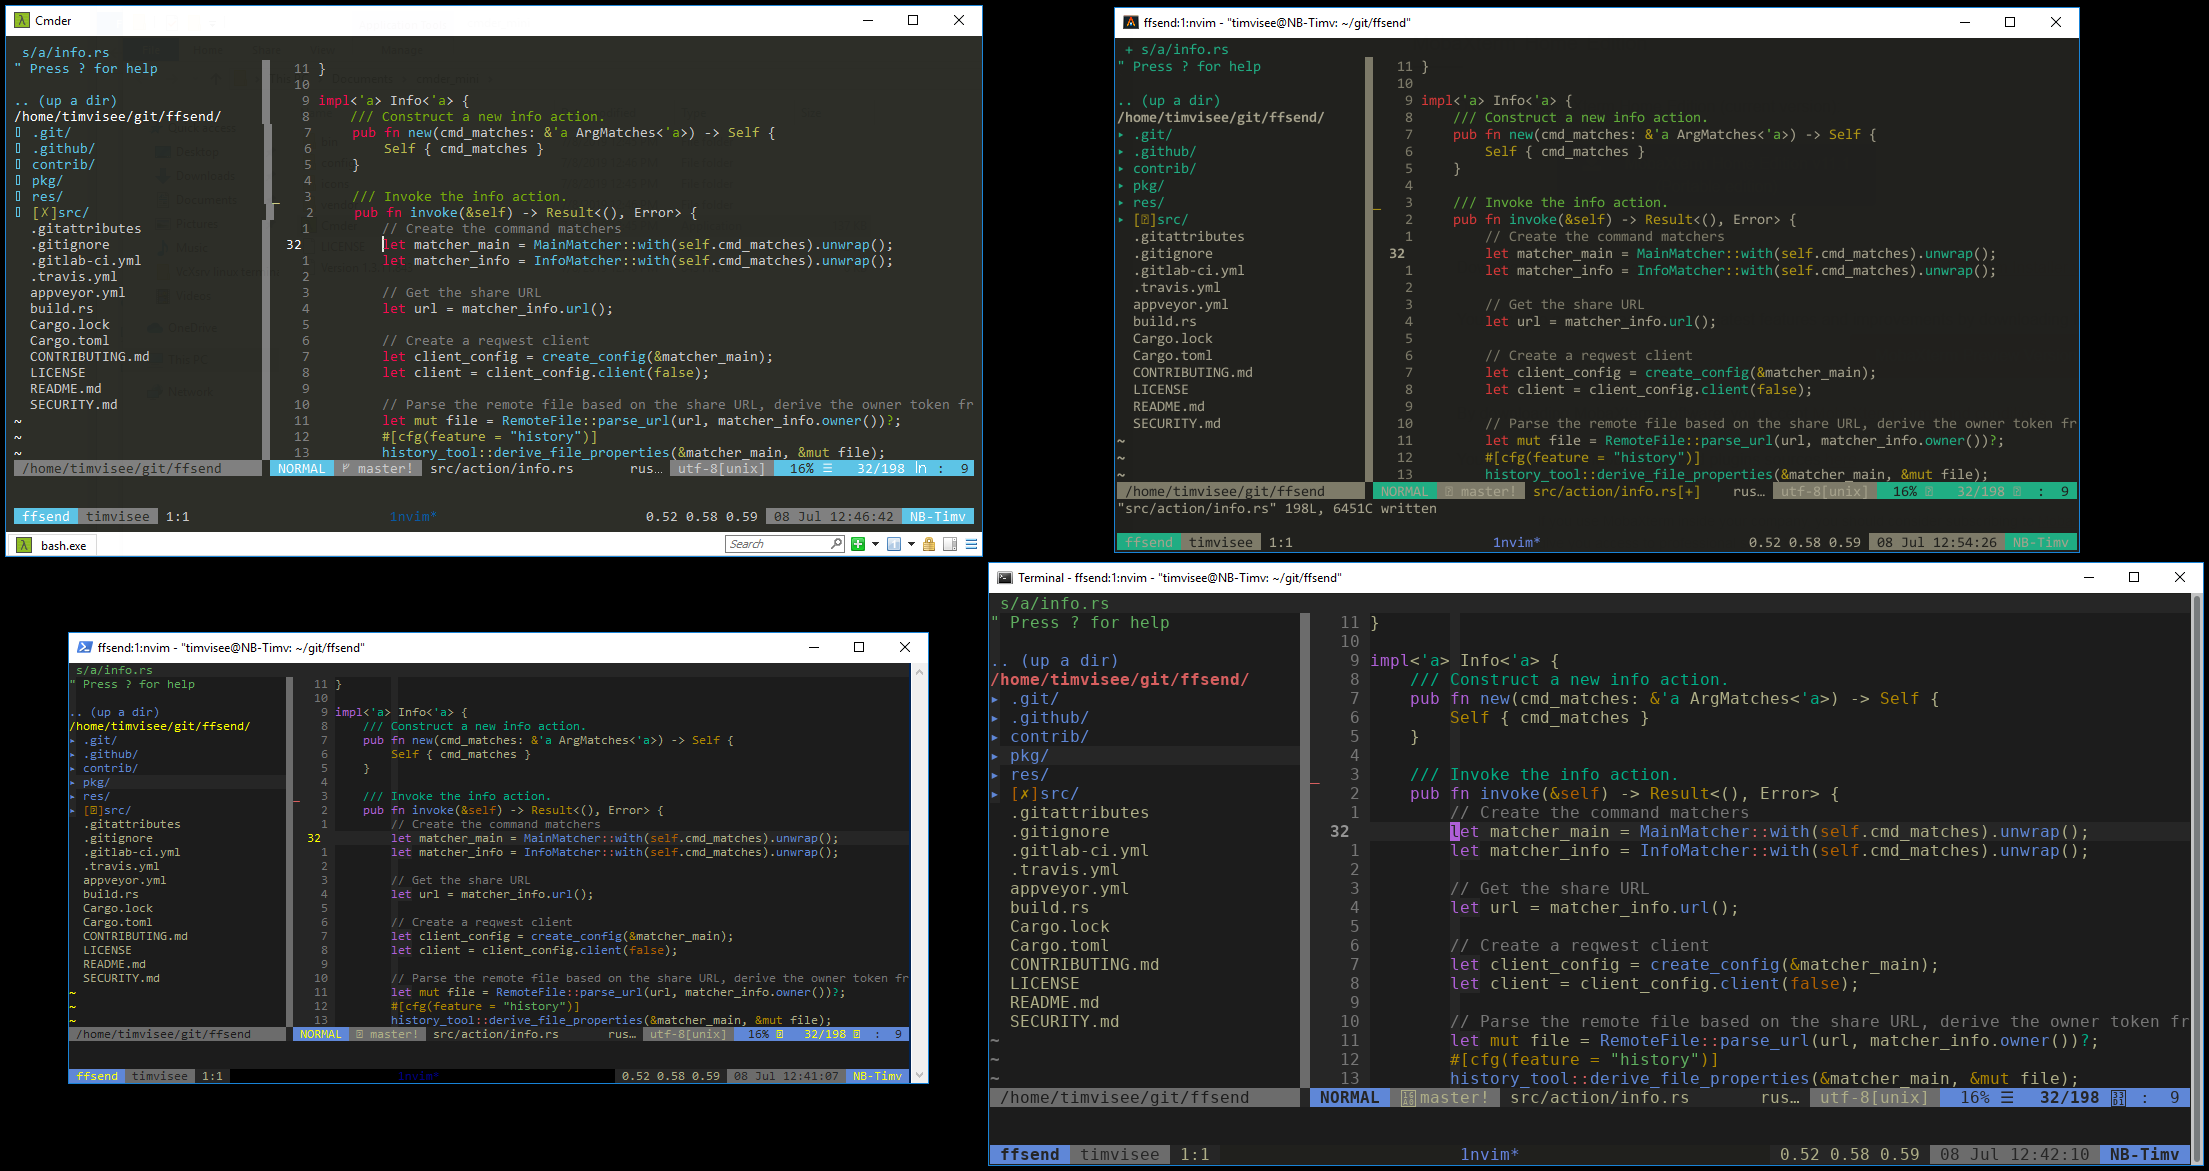
Using a custom shell, vim as text/code editor, git through its CLI,
dotfiles to sync settings across devices.
Everything is customized to my likings and styled with a nice color scheme.
All of it in a dark, text-based window on my screen.
Once you get used to your command-line tools, it's a serious joy to work with. It's a way to interface with your machine in a super-efficient and expressive manner. As you can probably imagine, it can be pretty frustrating when you don't have access to the tools you know and love.
I sometimes use a Windows machine, for work or for building Windows-supported software. Sadly, I feel pretty handicapped on this operating system, to be frank. I can't get comfortable (and I'm super OCD for that matter). The overall experience always appears to be subpar to what I'm used to.
Through some testing, I've located this to be a problem with the terminals on Windows. Though before the WSL era, running Linux tooling on Windows was literally unthinkable, the situation has already improved a lot. Almost every Linux tool works somewhat out of the box. Installing and configuring your software using dotfiles became a much better experience as well. The terminals on Windows still feel mediocre, it just isn't there yet.
I should note that this isn't a problem for light terminal usage in Windows 10 these days. When invoking simple commands through SSH, everything works beautifully. This is about using heavily personalized tooling, and as you can probably tell, I'm somewhat of a power user in this regard. Though, this might become useful in the future.
The problems
Throughout the past year, I've tried using a lot of different terminals
after giving up on the terminal included with bash on Windows.
Some of them include: ConEmu, hyper, Cmder, Terminus & PuTTY, with various
troublesome configuration attempts. I was never able to achieve the same
experience as I've had on Linux or macOS, have always encountered weird
shenanigans and was never really satisfied.
Personally, I can generalize the usual problems to the following:
- color schemes are problematic, and usually, look different than its Linux counterpart
- terminals on Windows appear sloooow, as a
vimuser you expect things to be instant - garbled output, no proper ANSI support
- some bindings don't work
With some more specific examples throughout the different terminals:
- weird lines between characters, random underlined text
- everything looks darker than it should be
- color channels are flipped
- some special characters are not rendered at all
- no support for
xterm-256colorat all
Simple solution
The solution to these problems honestly was quite simple, much more so than I initially thought:
Just run a Linux terminal you're familiar with, on Windows.
Yes, seriously. Why not use a Linux terminal, if you can't get Windows terminals to behave? Because this is Windows, not Linux? Nope!
Some effort is required to get this up and running, which is what I'll guide you through in the following section. Don't worry, this won't be hard and shouldn't take more than 15 minutes.
Linux terminal on Windows 10
Before we start, make sure you're running an up-to-date Windows 10 instance, and you need to have administrator rights. That's all, and you're good to go.
We'll be going through the following five easy steps:
- Enable WSL, install Ubuntu
- Install XFCE terminal
- Install X server
- Run XFCE terminal
- Create useful shortcuts
1. Enable WSL, install Ubuntu
Alright. The first big part is to get Linux software running on Windows in the first place. Lucky for us, Windows has WSL these days, making this a breeze.
To start, you must enable WSL on your installation. Microsoft's own
guide perfectly describes how this is done:
docs.microsoft.com/en-us/windows/wsl/install-win10
Once that is finished, you should install a Linux distribution that provides Linux tooling we need. We'll be using the Ubuntu distribution for this, which is most commonly used. (You may choose a different distro, although some of the following commands will be different.) Ubuntu is installed through the Microsoft Store, also described in this guide.
WSL & Linux: check ☑️
Let's continue.
2. Install XFCE terminal
Now you can pick a Linux terminal you want to use. We'll be using the terminal included with the XFCE desktop in this guide. It's a excellent versatile terminal, that is efficient, has superb color scheme support, and has all the options you need. Choosing some different you have experience with is fine as well, of course.
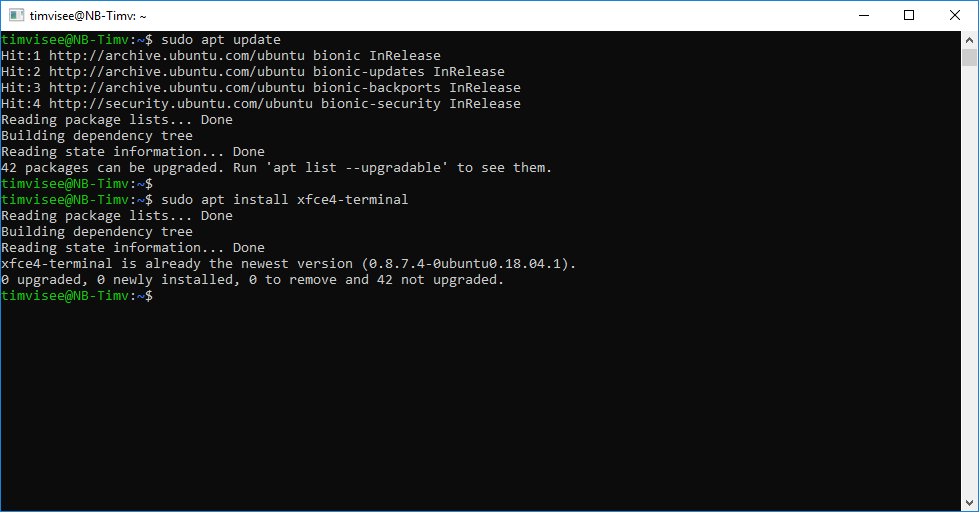
To install XFCE terminal, we'll use the Ubuntu package manager. Open the start
menu, and search for bash. This should bring up a terminal window running
Linux through WSL with a bash shell. Invoke the following two commands:
sudo apt update
sudo apt install xfce4-terminal
You won't be able to use the installed terminal just yet, because Linux in WSL has no way to draw a window on your screen at this time. We'll fix that in the next step.
A proper terminal: check ☑️
3. Install X server
Graphical Linux systems commonly use the X Window System (a.k.a. X11), used to manage and draw application windows on the screen. This system is very flexible & modular, which comes to good use in our case. X has various server implementations, not just for Linux but also for Windows, acting as a system for rendering windows.
Random fun fact: you can even draw windows over the network with X, to an external machine.
We need to install an X server on our Windows system and tell Linux in WSL to draw application windows to it. Guess what, this is the last installation step required for showing the terminal window!
In this guide, we'll be using VcXsrv, but other implementations
should work similarly. Visit its project page, download and install it:
sourceforge.net/projects/vcxsrv
Ability to render the terminal window on the screen: check ☑️
4. Run XFCE terminal
Now comes the fun part: actually starting and using the terminal.
You must start the X server we installed, tell applications in Linux to draw to it, and the terminal is ready to start. Note that this is required after each login.
Start VcXsrv
First, start the VcXsrv server we have installed. An icon should have appeared on your desktop, or you might find it through the start menu (named 'Xlaunch'). It will then ask us for some settings through a wizard:
Pick 'Multiple windows' for now, you can experiment with other options later.
Leave the 'Display number' value at -1.
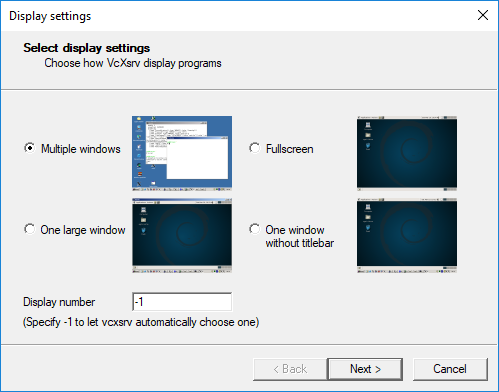
Just 'Start no client' for now, which allows us to show any number of Linux application windows. You can always start the terminal directly through here at a later time.
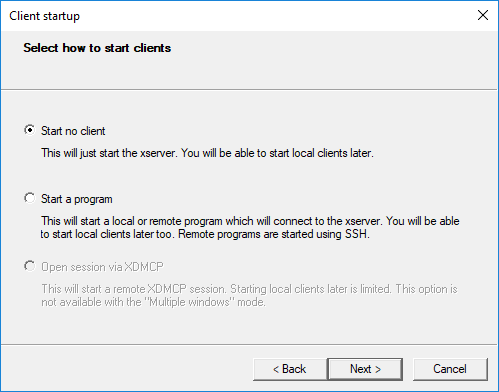
We want to sync the clipboard to make life easier.
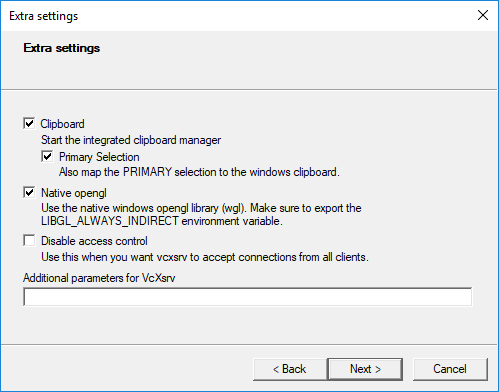
Click 'Next' one more time and start the server.
Start the X server: check ☑️
Configure X server address
After that, the X server starts and a taskbar tray icon should appear. This is useful because it tells us the address the server is running at. Right-clicking allows you to kill the server as well.
![]()
Our X server is running at 0.0, chosen by the server because we set the
display number to -1. We need the number before the ., being 0 in this
case, and have to configure this in the Linux environment.
Open a bash shell again through the Windows start menu to access the Linux
environment. And set the DISPLAY environment variable to :0, for our X
server address:
export DISPLAY=:0
Configured the X server address: check ☑️
Start the terminal
This finally makes your system ready to actually start the terminal. Invoke the following command and see the magic happen:
xfce4-terminal
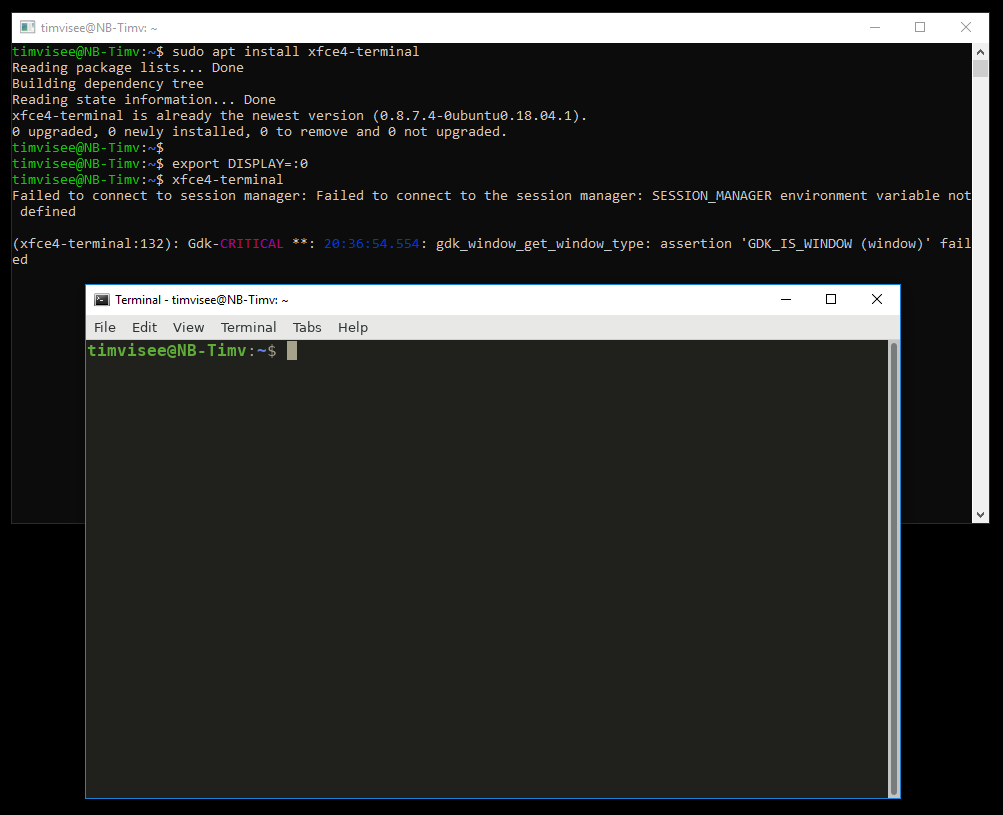
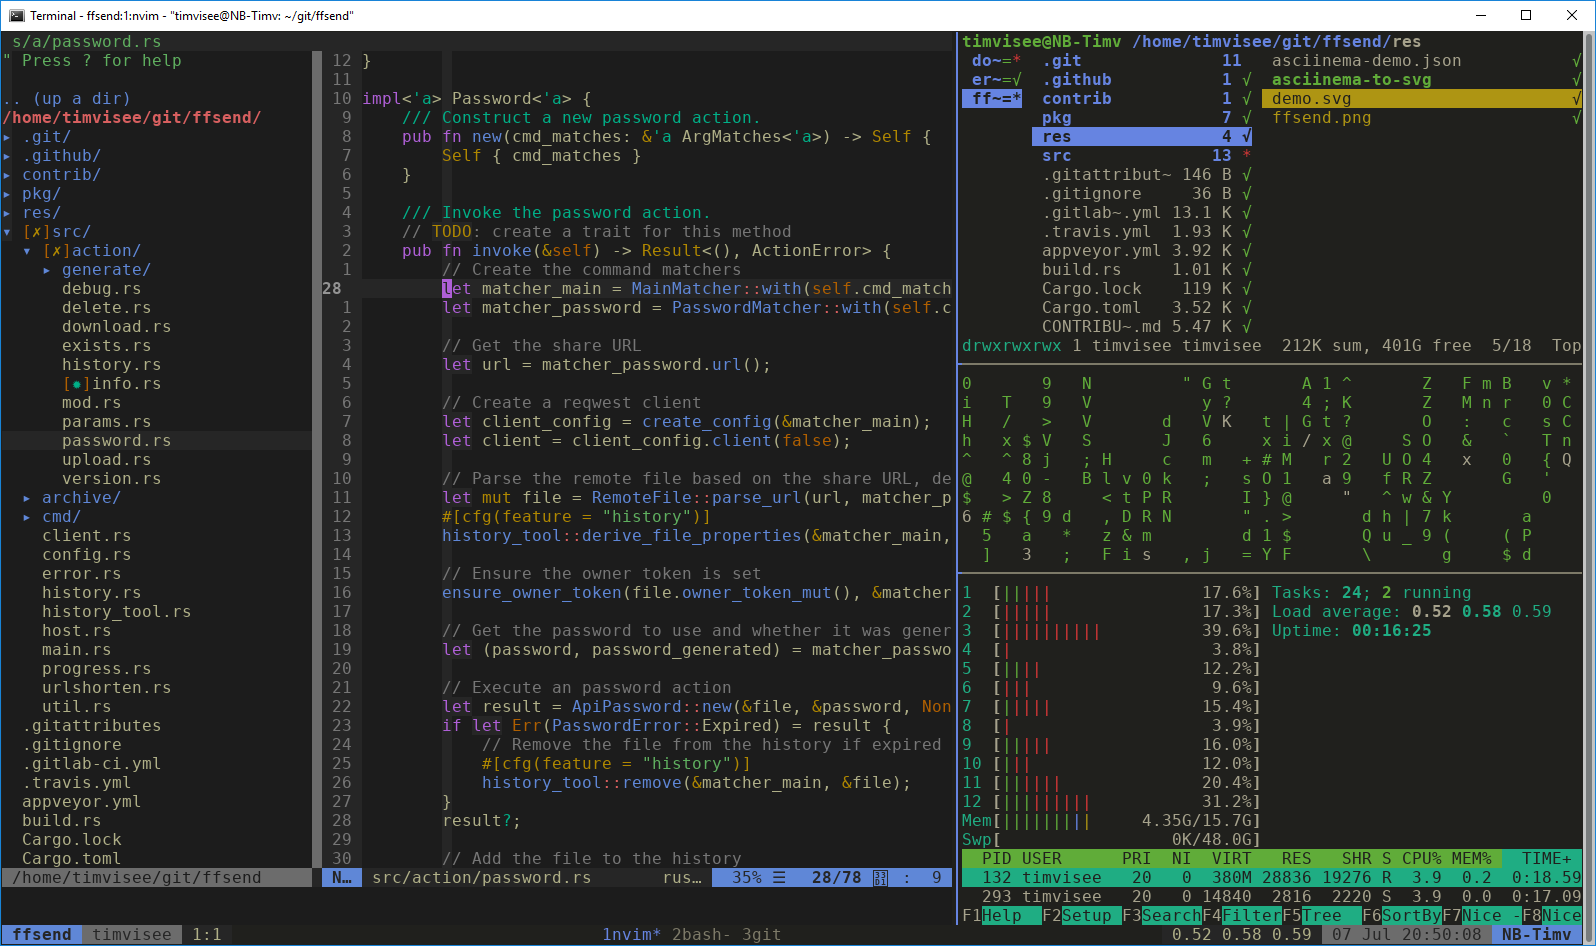
Oh yes! There it is, the XFCE Linux terminal on your Windows system in all its glory. The terminal has sane defaults, but I recommend to take a quick look through its settings anyway to pick the desired color scheme.
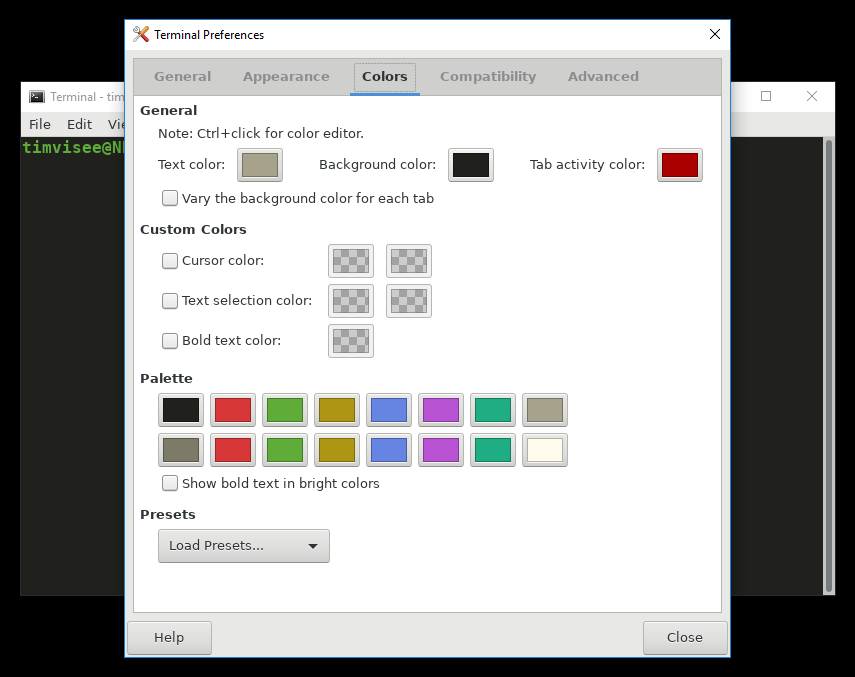
Your terminal is now ready to use to its full potential. Happy hacking!
5. Create useful shortcuts
Okay, we're not quite done yet.
As you might have noticed, these last few steps are required after each login,
which is cumbersome. The X server must be started, and you need to set
the DISPLAY variable for each bash shell you open from Windows. Though the
following steps are not required, it is highly recommended you follow them.
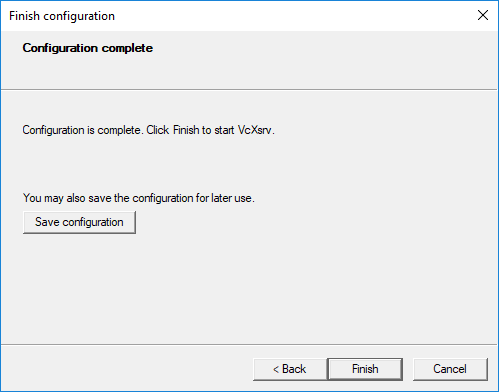
VcXsrv configuration file shortcut
It is possible to create a configuration file for VcXsrv, to instantly start the server without going through the wizard again and again.
To do this, go through the wizard one last time. You might want to use 0 as
'Display number' (instead of -1) to ensure you're always starting the server
on a consistent address. On the final wizard screen, a 'Save configuration'
button appears, click it and save it in an easy-to-access place such as your
desktop as it will act as shortcut.
Double-clicking the created configuration file/shortcut should start the server, and a tray icon should appear.
XFCE terminal shortcut
We can make starting the terminal easier by creating a custom shortcut. Right-click on your desktop or an Explorer window to create a new shortcut:
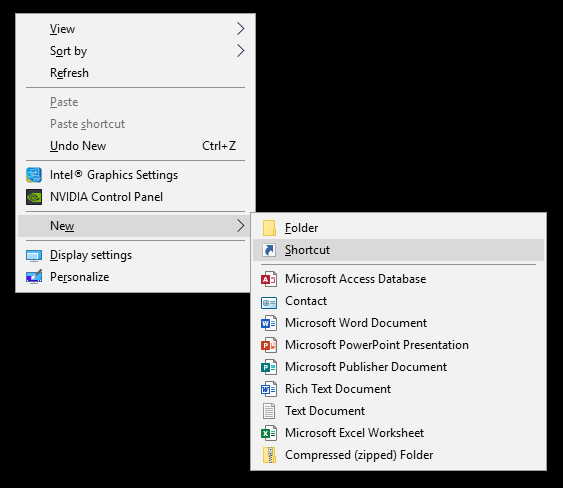
We'll start bash, and automatically invoke the commands we ran
before. Fill in the following command in the
'Location' field for this shortcut:
bash -c 'export DISPLAY=:0; xfce4-terminal -e bash'

Hit 'Next', pick a fun name and you're done.
Double-clicking the shortcut you've created should automatically open a new proper terminal window. Hurray!
Windows automatically spawns a window for the bash command we're running
through the shortcut, causing two windows to show up. This is annoying.
Luckily we can minimize this unused window by default. Right-click on the
shortcut, and hit 'Properties'. Set the 'Run' option to 'Minimized':
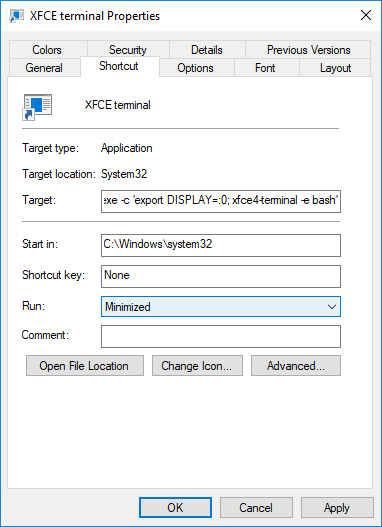
Not showing the
bashwindow at all is also possible with a workaround, but won't be covered in this guide.
Tips & Tricks
Here are some tips, tricks, and notices you might find useful.
You can extend the command used for the shortcut to automatically open a specific
Linux program or to start an ssh session. You can create multiple different
shortcuts as well. Here's an example to immediately start a ssh session I
commonly use:
bash -c 'export DISPLAY=:0; xfce4-terminal -e "bash -c \"ssh root@work.lan\""'
You can set the DISPLAY environment variable by default, by appending the export DISPLAY=:0 line to the ~/.bashrc file through your bash shell.
You can use other graphical Linux software as well after setting the DISPLAY
environment variable.
If Linux applications don't show up, and the shortcut immediately quits, you have probably configured an incorrect X server address or did not configure it at all. Review the Configure X server address section.
Here's a simple final checklist for all the steps to get a Linux terminal working:
- enable WSL, install Ubuntu
- install XFCE terminal
- install X server
- for each login: start VcXsrv
- for each
bashshell: configure X server address - for each
bashshell: start the terminal
Final thoughts
This solution isn't ideal. It takes effort to get up and running, and opening a new terminal isn't as easy as with other terminals. But for me, this is a solution that gives me the best terminal experience I've had on Windows. It works like a charm, and it feels super comfy. That is important.
Honestly, I find it kind of interesting, that almost every terminal on a Linux or macOS based system works flawlessly for any tooling with no configuration. However, on Windows, I don't see this quality, for something that seems so simple: rendering monospaced text on a screen.
Let's hope the terminal situation on Windows improves. A lot has been getting better lately since WSL was introduced, and many more people started experiencing these itches than before since Linux on Windows became a viable thing. I wonder what the upcoming Windows terminal will bring to the table.
I won't be going back to Windows anytime soon myself, but at least this provides a terminal I'm happy with when I need to use a Windows machine.
As always: Hope this helps! :wq